Contact Us

Use the form on the right to contact us.

You can edit the text in this area, and change where the contact form on the right submits to, by entering edit mode using the modes on the bottom right. 


123 Street Avenue, City Town, 99999

(123) 555-6789

email@address.com


You can set your address, phone number, email and site description in the settings tab.
Link to read me page with more information.

Sewing Tidbits

Sewing Tidbits is the sewing blog written since 2013 by Delphine, the co-founder of Just Patterns.

Filtering by Tag: free pattern

Peppermint Milton Pinafore - Waistband tutorial and a peek at the next pattern

Delphine (Sewing Tidbits)

Dear readers,

Happy new year and best wishes! I have a serious backlog of tutorials to share with you as well as the annual financial report (get ready for some big numbers!). What better way to start the year than with a tutorial? Today I’m showing you how to connect the waistband of the free pattern I developed for Peppermint Magazine: the Milton Pinafore.

Read More

Introducing the Peppermint Milton Pinafore

Delphine (Sewing Tidbits)

I have a big surprise for you today! In May, I was contacted and commissioned by the team at Peppermint Magazine to help develop a pattern for their free pattern initiative. Let me introduce you to the Peppermint Milton Pinafore!

Read More

SEWN - Open Skirt Project: final sample in floral

Sewing Tidbits

Dear readers,I have been talking about this project for a good 6 months and I think I am almost there. I showed you toiles and I felt quite of bad for not updating the blog about it... I always wanted to know what it took to develop pdf sewing patterns from scratch to a product usable by others than me. I did learn a lot and I still have a lot of work to do. So far, my 2 main take-away are:

  • It's not the patternmaking or the grading that takes the most time.

  • Writing instructions is really really hard.

OSP floral-13

OSP floral-13

I will probably write a post or two when I have some time about what I learnt. I feel some secrecy I cannot explain around the process. For instance, the tiling in Illustrator. Nobody explains clearly how they do it. I have to say that it is a bit annoying to figure it out but once you do your grid you can reuse it for any pattern. So I decided that I will share my grid with you and maybe save some time to people who wants to tile their patterns. Hopefully it will lead to more time to be spent on the patterns themselves! 

For this last (?) version of the pattern, I smoothed the hip curve, updated the vent construction and fused the whole hem and vent area. But most of the work went to the pdf, making sure that lines were showing up everywhere they should. Also it is layered, if you use Acrobat Reader, you can choose which size you want to print.

OSP floral-12

OSP floral-12

I took step by step pictures of the construction and tried to write an ebook. However I am not entirely convinced that it makes the process crystal clear. Now I also started doing some illustrations in Illustrator. I have 0 drawing skills so the process is quite painful! In case you download the instructions, I would very much welcome any feedback. You will also see that I added a "reference" section to highlight blogs, books and patterns that have guided me through my choices. In a way, I think of it as something between instructions and a mini-ebook.

OSP floral-6

OSP floral-6

On the seam finish I went back and forth between serged and and snug hug. Finally I decided for the snug hug. I talked about my obsession with this tape before so I will not repeat it! I also think it will appeal to more people (who may not have a serger). But what I like the most about it is that you can construct and finish everything with a straight stitch. In my case, it means everything on my industrial Juki. Fast and pretty results!!

OSP floral-1

OSP floral-1

OSP floral-2

OSP floral-2

OSP floral-3

OSP floral-3

OSP floral-4

OSP floral-4

Sorry for the pictures on my form. The form was made to measure 3 years ago in NYC but I lost some weight since (sigh...) and the skirt cannot close, but it does close on me!! I had this fabric for a year in my stash and I love love love it. I knew I wanted to use it for something special so this project was the one! It's a floral stretch cotton from Mood and it's all kind of perfect. Easy to work with, does not fray, presses well, etc. I made size 00 available and it's comfortable thanks to the stretch factor and the slightly higher back vent than usual.

New Size Chart

New Size Chart

Final words, , the PDF contains more pages than you may be used to for a simple skirt. First, pieces are divided between self fabric and fusible. All are intended to be cut single layer so the pieces for the self fabric are are laid on 21 pages and the fusible on 5.

OSP floral-5

OSP floral-5

If you are interested in

downloading the pattern and receive the updates, please 

sign up for the newsletter

(sent once a month if you get lucky). What I love the most about this project. is the email conversations I have with some readers since I started it. Feel free to tell me any of your thoughts in the comments or by email! I'm committed to making the best pattern I can with my limited time and amateur skills.

What do you think, any advice already?

Open Skirt Project: an update + PR Sewing Bee

Sewing Tidbits

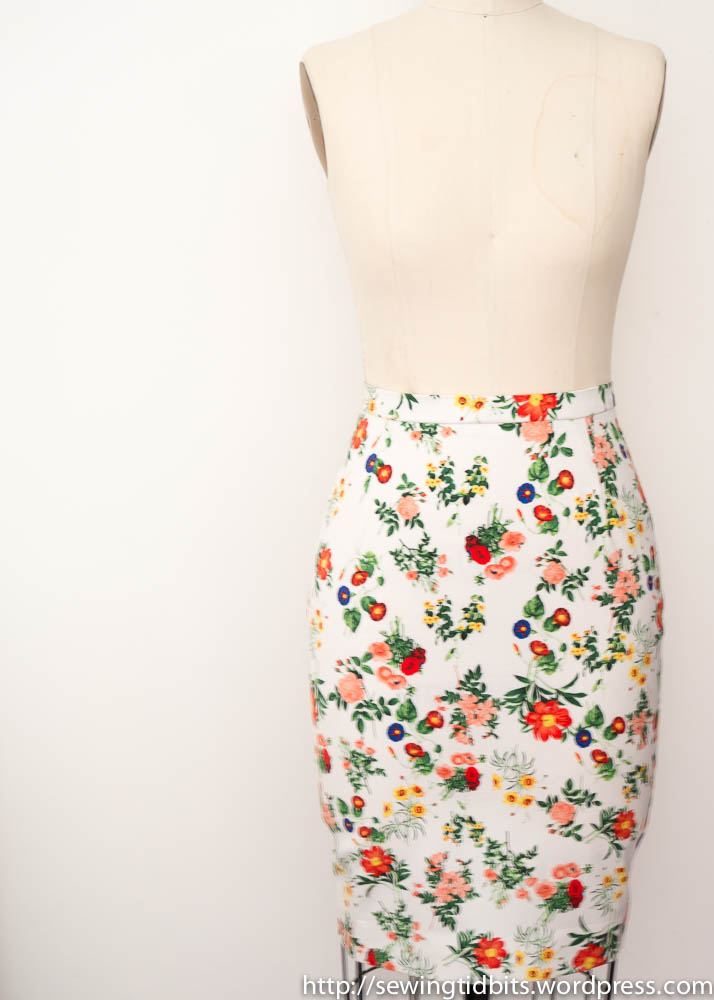
Dear readers, First of all, I'm super happy to report that I have passed round #1 of the PR Sewing Bee contest, along with 55 amazing other seamstresses. The bad news that the second challenge is a man shirt refashion. And I hate refashions, they don't suit my style. So it's going to be a real real challenge this time: make a refashion looking polished... I also needto buy a thrifted shirt in a Pèpè (second hand stuff sold on the sidewalks) because The Old Man will not commit one of his!To keep pretending that I follow-up on my announcements, I wanted to update you on the free skirt pattern that I have been talking about here. I created the first draft from the Muller&Sohn book and ran a first toile.photoI decided on a number of changes such as bringing some ease at the waist and shortening the back darts. I also offset the vent by 3/8" to make it appear more closed.For the second toile, I ran out of muslin and used the cheap gingham reserved for school uniforms in Haiti. By accident, I created the vent on the wrong side (and realized only after taking pictures).Openskirt V2I decided to bring the front darts a bit closer and to change some of the construction details of the vent. Also, the back is a bit big on me but I am a slightly smaller than my sample size.I have been exchanging emails with Miranda, a super nice reader, and a New York patternmaker friend about this project. Their input have been invaluable. Thus, I would like to extend the discussion to whoever is interested. I have a lot of questions about what would people prefer (serged edges, favorite zipper type, number of pages for the PDF, etc.) If you feel like telling me what you believe is the best way to sew a vent, to layout a pdf or you just want to sew the pattern for yourself, let me know. The pattern is currently available in my sample size (that I'm arbitrary named size 2).I already able to send V3 of the pattern in the sample size. Measurements are the following:

Sewing Tidbits - Skirt 1101 - Size 2
Cm Inches
Body Measurements
Waist 63 24 6/8
Hip 90 35 3/8
Hip Length 20.5 8 1/8
Finished Measurements
Waist 65.4 25 6/8
Hip 94 37
Skirt Length 55 21 5/8

Ultimately, i want to release 3 sizes, 1 up and 1 down from the sample size. If you want to participate in this discussion, please email me. I promise to send a weekly update on the project.Wow, promises... Dangerous.