I got a couple of questions on the construction of the welt pockets of the Veronica Vest, and it reminded me that I had taken pictures of my construction in preparation for a tutorial, but then I completely forgot about them! All this to say that if you have a question, do reach out. I really appreciate it! Let’s get started….
Read More
Before I start today’s post, I wanted to let you know that I’m thinking a lot these days about how I can engage better with you and address your fitting and sewing questions about my patterns in real time. I’m thinking of using my newsletter to share behind the scenes and potentially starting a discord channel. If you are not a newsletter subscriber, you can sign up here. It’s going to be fun!
Read More
Dear readers,
The Tatjana Trousers have stayed seriously on trend since their launch in December 2020, and since I know that many of you plan to sew a pair with the newly released Veronica Vest, I thought it would be a good time to finally publish a long-delayed tutorial for the slant pockets.
Read More
The Alek Rib Top is really fun and easy to sew but the neckline construction is a little unusual and that can make it a bit of a head-scratcher when sewing or when trying to figure out how to alter the pattern to get more/less coverage. This is what I will be covering today, in addition to a sewalong of the neckline construction.
Read More
Welcome to the fourth and last tutorial (for now 😅) of the Helena Wrap Dress. Today, I’m showing you how to attach the skirt to the waistband and finish the waistband. It corresponds to steps 20 to 24 in the instructions. My hope with these tutorials is to make the sewing of Helena more accessible, but I also took the opportunity to re-work the instructions based on the feedback I received. To celebrate, I have a surprise discount for you at the end of this post
Read More
Dear readers,
Happy new year and best wishes! I have a serious backlog of tutorials to share with you as well as the annual financial report (get ready for some big numbers!). What better way to start the year than with a tutorial? Today I’m showing you how to connect the waistband of the free pattern I developed for Peppermint Magazine: the Milton Pinafore.
Read More
I’m back with the third tutorial for the Helena wrap dress: the optional in-seam pockets. The pattern includes both the option of patch or in-seam pockets, and while researching the finishings of this dress, I came upon a construction more suitable for french seams.
Read More
I’m back with the second and most requested tutorial for the Helena wrap dress : the waistband construction. In the previous one we covered the neckband construction, and this time we are going to go over step 13 to 16. First, it’s helpful to understand the structure of waistband.
Read More
Dear readers,
I’m planning three tutorials for Helena: the neckband, the already infamous waistband and the in-seam pockets. Today, we are starting with the shoulder/neckband construction, which is a key feature of this pattern. It corresponds to step 2 to 7 in the instructions.
Read More
I’m happy to be back today with a tutorial for the zipper fly of the Tatjana Trousers. I adapted it from one of my favorite construction books: Sewing Techniques from The Fashion Industry by Laurel Hoffman (I highly recommend this book if you are serious about sewing and interested in RTW construction). Some customers have told me it’s their new favorite way of sewing a fly but I also know that others were confused so I hope that the pictures can help!
Read More
Today’s hack is inspired by the beautiful Fond sweatshirt of Rachel Comey. It involves very few changes to the pattern (using a sweater knit, lengthening the sleeves, adding a sleeve cuff, and leaving the hem raw). The final garment is a fun and unique sweatshirt!
Read More
Today, I’m sharing a long-delayed post for a hack I saw in New York City shop window back in 2017! I think it’s a relatively simple hack for a high-impact. Although the draped effect seems intricate, it is achieved by simply adding panels to the front of your shirt that can be buttoned at the back.
Read More
You are so close to having completed your Stephanie Skirt, only a little bit of hand sewing left. So put on your favorite TV show or podcast, grab a warm drink and let’s get started!
Read More
We are approaching the end of our Stephanie Skirt sewalong and I’m so glad that you found those posts useful! In case you are new to this serie, you can check out previous posts here and get the sewing pattern in our shop.
Today, I’ll be showing you how to finish the center back seam of your skirt and attach the waistband.
Read More
Hello and welcome to a new installment of the Stephanie Skirt sewalong!
Today I’ll be showing you the preparation of the pleats and how to insert a perfect and pucker-free invisible zipper at center back. I know that zippers, and in particular invisible zippers are still a source of stress for many sewists but they really don’t have to be!
Read More
Welcome back for the third part of the Stephanie Sewalong! In my previous posts, I covered inspiration and fabric choices and cutting the fabric, so it’s time to start sewing!
The updated version of the Stephanie Skirt pattern now includes fully illustrated step-by-step instructions. I decided to use alternative construction options so that it’s less redundant. If you follow the pattern instructions, the seams are simple and seam allowances are either serged (or zig-zagged) or bound. In this post, I’ll be showing you how to sew the side seams and the in-seam pockets with french seams.
Read More
Welcome to the second part of the Stephanie Sewalong!
I hope that my previous post inspired you and help you pick your fabric! Remember that you only have until tomorrow to enjoy 20% off a selection of fabric from Selvedge and Bolts (check out the blog post for more details). Today we will start slowly by preparing the pattern and cutting fabric and the fusible interfacing.
Read More
The question we most often get regarding our Kate Bias Top and the Christy Slip Dress patterns, is how to create those barely-there spaghetti straps. We have good news! They are easy to make and we will be showing you how in this post.
Read More
The information we include with our patterns may be less detailed than what you are accustomed to, but they should provide enough information for an intermediate sewer or an adventurous beginner to complete the garment. In this post we'll show you where to locate the most important elements and use the layered PDF functionality. When you buy a pattern in our store, you receive a link to a zip file containing the following :
Below is the cover of our Christy Slip Dress:
In the following pages you will find information about the style, fabric recommendations and the cutters must. It summarizes how many of each pattern pieces you need to cut in each fabric (self, lining, fusible, etc.). As well as other pieces for which paper pieces are not provided, such as bias strips. It also includes the technical drawing of the garment and an estimation of fabric requirements. We currently do not include cutting layouts because of how much they can vary depending on the size you are cutting and the width of your fabric.
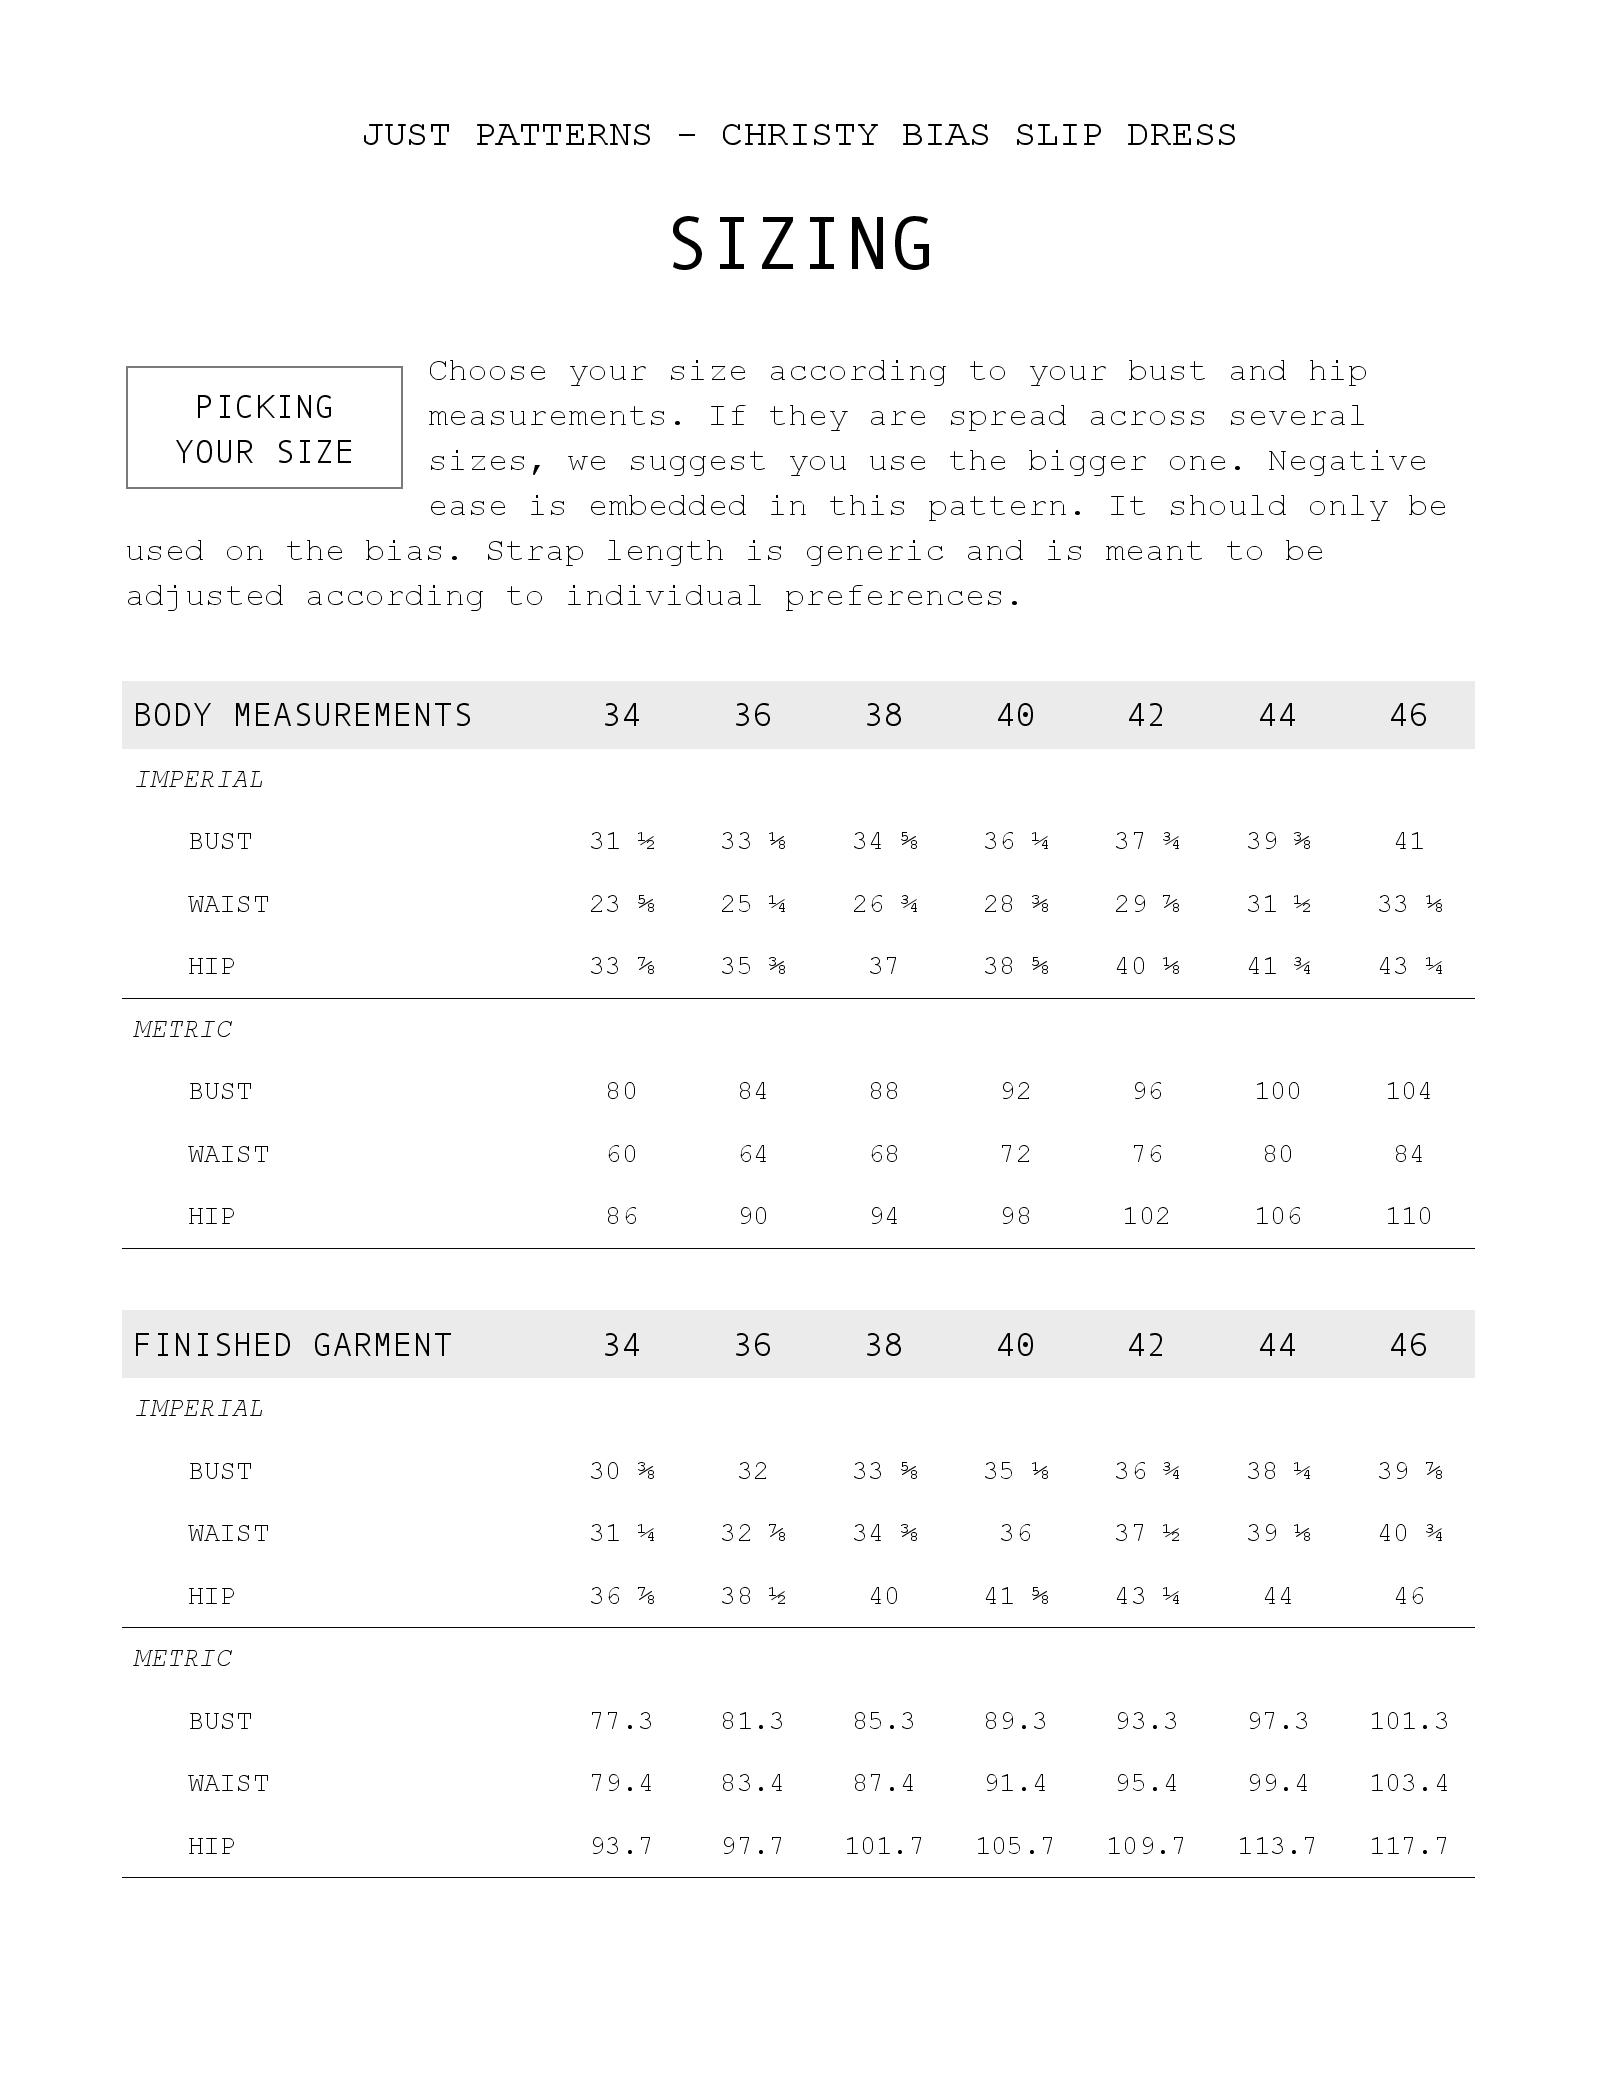
The Christy Slip Dress is currently available in size 34 to 46 and the pattern includes negative ease. We recommend choosing your size based on your bust measurement for this pattern.
Next is the printing layout that will help you put together the pattern after printing it.
The following table is a suggested order of operations. This is the order we used to sew the samples shown on the cover. But if you are making changes to the pattern, for instance you decided to make the pattern single layer and finish the edges with bias binding, then these operations will be quite different. The table is designed for you to check at a glance the width of the seam allowances and type so you don't have to rummage through pages of text to find it.
In case you need more help, links to tutorials, videos, etc. are available in the resource page of each pattern. Finally, you'll find the hashtags to share your work on social media. For the slip dress it's #christyslipdress and for the camisole it's #katebiastop (there is another Kate Top sewing pattern out there by Tessuti, so don't forget to add the bias!).
Now let's have a look at the pattern files! The layers are enabled in every printing format. When you open your pattern in the Adobe Acrobat Reader, use the layers tab on the left of the screen and select only the size you need but keep "print marks" and "all sizes" activated. As you can see above, the pattern pieces extend beyond the cutting marks. This should make it easier for you to put it together. You will also notice that the seam lines are printed on all pieces. This is why we strongly recommend you use the layer function. Otherwise it can get quite busy, even for a simple pattern.
We hope that this post was useful and we will be back soon for some actual sewing posts! Don't hesitate to reach out in the comments or anywhere else if you would like more information! Do you see a Christy or a Kate in your near future?